In very simple words, Single Sign On is the ability to use services of multiple websites by signing in only single time. Imagine a cluster of websites, either they belong to one company or to different companies but partners; each website requires user authentication before anyone could navigate through it. However, they also want member users of their partners to freely browse through their websites. So this means that one website will authenticate a user, and then pass her user credentials to the other partner website so that she can freely browse, right? Wrong! What will actually happen is, one website will authenticate a user, and then pass, what we call, a SAML Assertion to the other partner website, this SAML Assertion will tell the partner site that “The user I’m passing to you is a good person, treat her well”. The partner website will read this message and create all the required session variables and authentication settings and thus user will seamlessly keep on browsing from one partner website to the other and so on. Okay, enough with the definition let me quickly explain under what scenarios you should implement SSO. Well, I’ve already explained this, either your company has multiple websites, or your company has some partners, and they want their users to freely navigate through their websites, SSO is the right choice!
Single Sign On (SSO) in .NET:
So as you might have already expected, in this demo, we’ll be creating at least 2 websites, we’ll create some dummy information e.g. demographics, in one website and pass it to the other. The website that passes the information is called Identity Provider, and the website that receives the info is called Service Provider. That’s pretty much standard, so we’ll follow it. Okay, so let’s create our Identity Provider website first.
Creating Identity Provider:
Before we can actually start creating the project we need to download Component Source’s class libraries that implement SAML SSO protocol. The libraries can be downloaded from here:
http://www.componentsource.com/products/componentspace-saml2-component/index.html
Download evaluation version and get started. After you download the right version for your computer and install it successfully (installation process should be really very straight forward), you are ready to create Identity Provider website. In addition to the SAML libraries, there is one more thing that I want to mention in this section, i.e. when Identity Provider passes some information to Service Provider, it doesn’t just want to simply pass it, rather, in order to thwart any hacker’s efforts of gaining access to confidential information, it wants to encrypt the data first and then hand it to Service Provider. To achieve this, we’ll use public certificate files. How public certificates work is beyond the scope of this article and needs a whole chapter on data security, so we’ll skip on that and simply get the certificate file and add it into our project. Follow the steps given below to start creating Identity Provider website:
- Start Microsoft Visual Studio 2005 or later.
- Click Create New Project
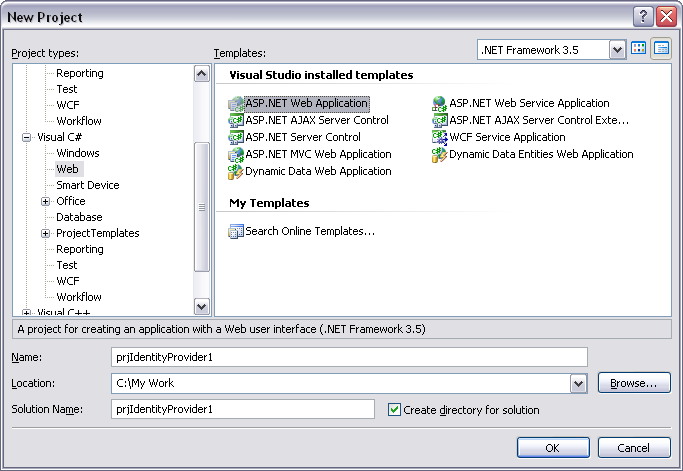
- In New Project dialog box, select Visual C# in Project types panel on left.
- Select ASP.NET Web Application in the Templates panel on right.
- Give a decent physical path and name to your project and select OK.

By doing this, IDE will create a web application project with a default form added into it.
- The first thing you need to do is, copy ComponentSpace.SAML2.dll to bin directory of this web app. ComponentSpace.SAML2.dll will be found at the following location, if you selected default options during installation; if you did not, then please help yourself and locate where you installed SAML:
C:\Program Files\ComponentSpace\SAML v2.0 for .NET
- After you copy ComponentSpace.SAML2.dll into your bin directory, add reference to this dll into your project.
- The certificate file, as explained above, should be available at the following location, copy this file and paste it on the root of your project, then, include it in the project:
C:\Program Files\ComponentSpace\SAML v2.0 for .NET\Examples\SSO\IdP-Initiated\SAML2IdP\idp.pfx
- Add System.Security in the references of the project.
- Next, rename your Form1.cs to frmSendData.aspx, right click this page and make it a Startup page of the application.
- Right click the project node in solution explorer and add Global.asax.
- Lastly, make the project run from IIS, instead of IDE. For more details on how to do this, get help from this link
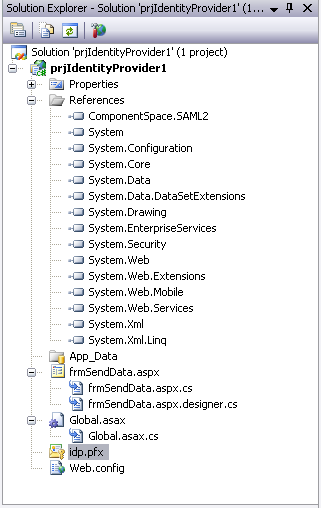
After completing the above steps your Solution Explorer should look something like this:

Now we are ready to start coding, let’s start with Global.asax. Following is the code that we’ll put in Global.asax.cs (line numbers are given for explanation and are not part of original code):
using System;
using System.Collections.Generic;
using System.Linq;
using System.Web;
using System.Web.Security;
using System.Web.SessionState;
using System.Web.Configuration;
using System.IO;
using System.Net;
using System.Net.Security;
using System.Security.Cryptography.X509Certificates;
namespace prjIdentityProvider1
{
    public class Global : System.Web.HttpApplication
    {
        // path and name of the free certificate file provided by Component Space
01        private const string idpCertificateFileName = "idp.pfx";
        // hard coded password of certificate file
02        private const string idpPassword = "password";
        // the name by which we'll store certificate in application level variable
03        public const string IdPX509Certificate = "idpX509Certificate";
        // since it's a test application, we'll allow all certificates
04        private static bool ValidateServerCertificate(object sender, X509Certificate certificate, X509Chain chain, SslPolicyErrors sslPolicyErrors)
        {
            return true;
        }
        // this method creates an X509Certificate2 object and returns to the caller method,
        // where it is stored in an application level variable
05        private static X509Certificate2 LoadCertificate(string fileName, string password)
        {
            // if file is not found, raise an exception
            if (!File.Exists(fileName))
            {
                throw new ArgumentException("The certificate file " + fileName + " doesn't exist.");
            }
            try
            {
                // if file is found instantiate the object and return it
                return new X509Certificate2(fileName, password, X509KeyStorageFlags.MachineKeySet);
            }
            catch (Exception exception)
            {
                throw new ArgumentException("The certificate file " + fileName + " couldn't be loaded - " + exception.Message);
            }
        }
        // on application start create X509 certificate object and store it in application
        // level variable
        protected void Application_Start(object sender, EventArgs e)
        {
            ServicePointManager.ServerCertificateValidationCallback = ValidateServerCertificate;
            // create the file name using app path and physical file name of certificate
            string fileName = Path.Combine(HttpRuntime.AppDomainAppPath, idpCertificateFileName);
            // instantiate the X509 certificate object and store it in application level variable
06            Application[IdPX509Certificate] = LoadCertificate(fileName, idpPassword);
        }
        protected void Session_Start(object sender, EventArgs e)
More Here
Courtesy:http://mukarrammukhtar.wordpress.com/single-sign-on-p-1/