Okay so I’m assuming that you’ve already read the part 1 of this tutorial. If you have not, then please read it, because things won’t make much sense to you without reading it. So in this article we’ll see how to create a Service Provider for Single Sign On. As explained earlier, Service Provider is receiver of the data that is being passed to it from Identity Provider.
Creating Service Provider:
- Start Microsoft Visual Studio 2005 or later.
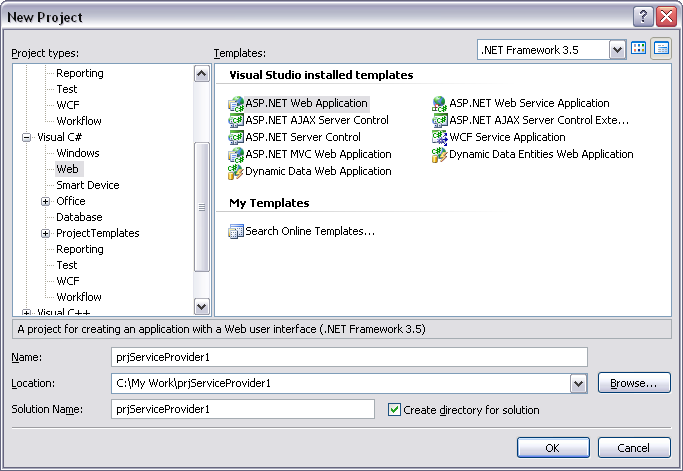
- Click Create New Project
- In New Project dialog box, select Visual C# in Project types panel on left.
- Select ASP.NET Web Application in the Templates panel on right.
- Give a decent physical path and name to your project and select OK.

By doing this, IDE will create a web application project with a default form added into it.
- The first thing you need to do is, copy ComponentSpace.SAML2.dll to bin directory of this web app. ComponentSpace.SAML2.dll will be found at the following location, if you selected default options during installation; if you did not, then please help yourself and locate where you installed SAML:
C:\Program Files\ComponentSpace\SAML v2.0 for .NET
- After you copy ComponentSpace.SAML2.dll into your bin directory, add reference to this dll into your project.
- The certificate file, as explained above, should be available at the following location, copy this file and paste it on the root of your project, then, include it in the project:
C:\Program Files\ComponentSpace\SAML v2.0 for .NET\Examples\SSO\IdP-Initiated\SAML2IdP\idp.cer
- Add System.Security in the references of the project.
- Next, rename your Form1.cs to frmReceiveData.aspx, right click this page and make it a Startup page of the application.
- Right click the project node in solution explorer and add Global.asax.
- Right click the project node in solution explorer and add Default.aspx.
- Lastly, make the project run from IIS, instead of IDE. For more details on how to do this, get help from this link
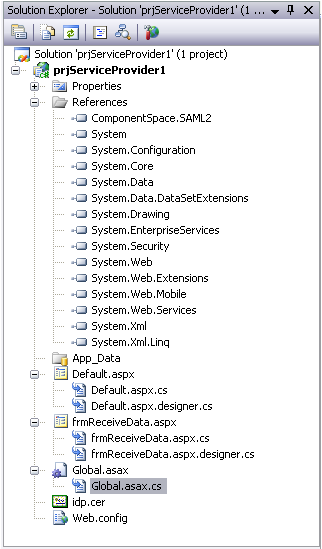
After completing the above steps your Solution Explorer should look something like this:

Now we are ready to start coding, let’s start with Global.asax. Following is the code that we’ll put in Global.asax.cs, if you have already read part 1 of this article then you don’t need any explanation of lines of code below, it’s pretty straight forward:
using System;Once global.asax.cs is set, next is the turn to write code in frmReceiveData.aspx.cs. The aspx file of this form needs no components and will be written as follows:
using System.Collections.Generic;
using System.Linq;
using System.Web;
using System.Web.Security;
using System.Web.SessionState;
using System.IO;
using System.Net;
using System.Net.Security;
using System.Security.Cryptography.X509Certificates;
namespace prjServiceProvider1
{
public class Global : System.Web.HttpApplication
{
// The identity provider's certificate file name - must be in the application directory.
private const string idpCertificateFileName = "idp.cer";
// The application key to the identity provider's certificate.
public const string IdPX509Certificate = "idpX509Certificate";
// As part of the HTTP artifact profile, an artifact resolve message is sent to the artifact resolution service,
// typically using SOAP over HTTPS. In a test environment with self-signed certificates, override certificate validation
// so all certificates are trusted.
private static bool ValidateServerCertificate(object sender, X509Certificate certificate, X509Chain chain, SslPolicyErrors sslPolicyErrors)
{
return true;
}
// Loads the certificate from file.
// A password is only required if the file contains a private key.
// The machine key set is specified so the certificate is accessible to the IIS process.
private static X509Certificate2 LoadCertificate(string fileName, string password)
{
if (!File.Exists(fileName))
{
throw new ArgumentException("The certificate file " + fileName + " doesn't exist.");
}
try
{
return new X509Certificate2(fileName, password, X509KeyStorageFlags.MachineKeySet);
}
catch (Exception exception)
{
throw new ArgumentException("The certificate file " + fileName + " couldn't be loaded - " + exception.Message);
}
}
protected void Application_Start(object sender, EventArgs e)
{
// In a test environment, trust all certificates.
ServicePointManager.ServerCertificateValidationCallback = ValidateServerCertificate;
// Load the IdP certificate.
String fileName = Path.Combine(HttpRuntime.AppDomainAppPath, idpCertificateFileName);
Application[IdPX509Certificate] = LoadCertificate(fileName, null);
}
protected void Session_Start(object sender, EventArgs e)
{
}
protected void Application_BeginRequest(object sender, EventArgs e)
{
}
protected void Application_AuthenticateRequest(object sender, EventArgs e)
{
}
protected void Application_Error(object sender, EventArgs e)
{
}
protected void Session_End(object sender, EventArgs e)
{
}
protected void Application_End(object sender, EventArgs e)
{
}
}
}
<%@ Page Language="C#" AutoEventWireup="true" CodeBehind="frmReceiveData.aspx.cs" Inherits="prjServiceProvider1.frmReceiveData" %>
Yep, that’s right, literally nothing, just one line! But cs file of it won’t be like this, let me show you its code little by little, we need the following namespaces:
using System;
using System.Data;
using System.Configuration;
using System.Collections;
using System.Web;
using System.Web.Security;
using System.Security.Cryptography.X509Certificates;
using System.Web.UI;
using System.Web.UI.WebControls;
using System.Web.UI.WebControls.WebParts;
using System.Web.UI.HtmlControls;
using System.Xml;
using ComponentSpace.SAML2;
More Here
Courtesy:http://mukarrammukhtar.wordpress.com/single-sign-on-p-2/